Overcooked ham what to do with it: Unless you haven’t experienced overcooked ham, you will not hesitate to find a solution to fix it if it is possible to ever do so.
Luckily, there are available solutions for this common mistake and that’s exactly how it will be treated in this article.
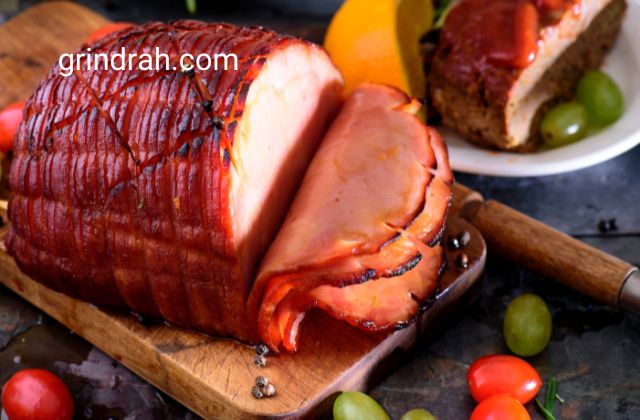
Overcooked ham what to do with it? Ham comprises three forms of matter that include, liquid, fat, and protein. The juicy part is the liquid; the fats are the portions that enhance the flavor of the ham.
As soon as you cook the ham for too long, it loses water and fats and then becomes too dry. This is a very bad experience.
Without liquid and fats in ham, you are left with flavorless protein. Definitely, this is too bad to experience because no one will like to taste tasteless ham. What do you do in this situation? You will begin to think if there is any magic that can bring back the liquid and fats into the ham. It seems impossible, right?
Well, I don’t have any magic or miracle to perform here but I have done research on different methods and processes that you can use to recover your ham. Keep reading to discover more about the processes.
By now, I am very sure you are already deleting the thought of throwing your overcooked ham from your mind. You are getting excited, and now, can’t even wait to read the methods I claimed can work. In a minute’s time, I would have provided these tricks.
These are the Methods you can use to fix overcooked hams
Cooking it in Liquid
• Return the moisture when your meat got overcooked. Cook it until it becomes tender. This can happen only by cooking it in liquid. However, don’t forget to make use of the same pan used during the first cooking.
• Broth is a liquid substance made from water (add meat to a few tablespoons of water, the broth is okay too) that bones and meats have been simmered. As soon as you are done with that, allow the liquid to penetrate into the ham. To tenderize the ham, simmer it in an acidic liquid such as lemon juice or vinegar and add flavor as well as moisture.
• At this junction, you have successfully moisturized the ham. The next step is to transfer back the ham to the pan that contains the broth and then heat it up to boil.
• Cover the ham, and allow it to simmer by lowering the heat. This simmering should not take above 3 minutes in the broth so that the spices and flavored taste will be revived.
• After 3 minutes, check to confirm how moist the ham is, after which you should flip and then simmer for another 2 minutes.
• Let the ham be in the broth for a while and then you are ready to serve it, reduce the broth to see until it is thickened—slightly though.
This is not the only way you can use to fix overcooked ham. It depends on the choice you selected. I have promised before now that I am going to make available various methods or processes to revive your overcooked ham.
Chop the Ham and Cook
You can chop the overcooked ham into smaller chunks and make a stir-fry—stir it in an overheated pan. After that, shred and place it in a slow cooker along with barbecue sauce.
This process is simple and easy and through it, you can transform overcooked ham back into tasty and flavored meat.
Simmer your Ham into Stew or Soup
I recommend that you apply this method when you notice the ham is too tough to consume due to its being overcooked. To revive your ham via this method, completely overcook the ham until it becomes tender.
Don’t forget, this time around, your job is to cook the ham either as stew or soup ingredient directly. This method is different from the first method which involves the ham being cooked in the broth.
For this method to be easier, kindly use a pressure cooker to hasting the rate at which the ham gets softened. This means you don’t need to throw the overcooked ham away. Use my method or other suggested ones by other bloggers that best work for you to always revive your overcooked ham.
11 Common Mistakes people make cooking Ham
It is necessary that I discuss the 11 common mistakes people make cooking ham so they will further serve as a guide for you to avoid them. No one likes it when it comes to having substandard taste in ham due to overcooking or undercooked.
Baked ham has this unique taste and flavor, especially when made at home at your own convenience. Imagine that ham is perfectly cooked to shining glazed perfection and served in warm juicy slices.
The hardest ham to cook during a holiday is turkey—no doubt about that as it has got the reputation several times. It is hard to bake whole ham sometimes.
Let’s take for instance ham such as the hind leg of a pig that has been cured using a mixture of nitrates, sugar, and smoke which can be tricky to cut perfectly. This has to do with its size and precooked nature, most of the hams you bought in the store have been cooked and cured in some way prior to your taking it home for cooking. It can be difficult to avoid not overcooking this dish.
Following these steps and tips will help you get to the ultimate whole ham that will deliver your holiday fantasies with minimal kitchen-induced stress and fear.
Buying the Wrong type of Ham
The sad news is that not all hams are created the same but the good news is that you can always select the right hams if you learn how to do so. This is why it is essential to pay attention to the kind of ham you pick for your meal. Originally, you can always find two major types of ham available for you to purchase—country hams and city hams. If your cooking purpose is holiday dinner, you may want to select a city ham. These types are submerged in a mixture of saltwater, pre-cooked, and ready to be transformed into golden brown creation.
Regarding the type of ham, I will recommend you consider the quality of the meat you’re buying. There are two tasteless options for every delicious high quality, so, you have to take time and money to select the one that is worth being used for a holiday dinner meal. Your local butcher can provide good bone-in ham, you can as well order online.
Boneless or artificially Treated Ham
Although boneless ham might be tempting for its ease of slicing, the types that contain bone will not only add flavor but moistness to your ham in the end and ease your cooking experience. The bone will help guide your thermometer to the right spot while testing the temperature of the meat and this can lead to an extra release of flavor to soups and stews long after the last of your ham has been bolted up.
If you find out that a ham has been artificially plumped, you need to keep off from it. High-quality hams are usually submerged in a saltwater solution, while the cheaper and fake ones can be injected with water salt water and another man-made flavor to save time and money. You must check the label to ensure that the only ingredient listed is ham and this rules out any man made trick.
Failure to Line your Pan
Before baking, line up your ham pan with heavy-duty foil, this will benefit your post meal cleanup as well. If you skip this step, will make the ham create some shell on your pan. I am sure you don’t want to waste your time removing what you should have simply avoided in the beginning.
Cooking the Ham Cold
Transferring the ham from the freezer or fridge directly to the oven will make the cooking a bad experience. You may want to bring your ham to room temperature before transferring it to the oven; this will make it cook evenly. This can be done by setting the ham on the counter for an hour prior to cooking.
Ham Drowning Mistake
It might look sensible to add as much moisture to the ham as possible before and during the preparation process to prevent it from drying out; this can be eventually a restriction to the ideal ham. Instead of basting the ham throughout the cooking process, add a half cup of stock, water, or wine to the bottom of the pan as you cook it. This will infuse moisture into the ham throughout the cooking process. In other to preserve some of the moisture, cover the ham with foil throughout the cooking process. You can only remove it when you get to the glazing process.
Glazing Ham too Early
Jumping the gun on the glazing may possibly result in slightly burnt skin hindering the actualization of a musing flavor. To avoid this mistake and that of overcooking, you can brush on the glaze for 20 to 30 minutes before scheduling the ham ensures that it is not overcooked.
Not Scoring the Skin
Scoring the meat means cutting slightly into the skin in a crisscross manner across the whole surface—ensure the fats render out and the glaze seeps into the inner meat rather than only the out part. This step worth it though can add more cooking process.
Using a Glaze Packet
Especially when you are running out of time, using a packet of already-made glaze that usually comes with a spiral cut may be very tempting. However, if you can just sacrifice a few minutes to produce your own glaze remains the easiest way to cook a perfect ham. If you may like brown sugar glaze for a sweet and savory experience, I recommend it.
Spending too much time on too High Temperature
For the best experience in the ham cooking process, stick to low, slow, and even temperatures. Some recipes may demand that you auto-pilot them if possible but cooking a ham for longer at a low temperature say 300 to 325 degrees, remains a perfect approach to get it done well. The result of this step will be that you will be left with flavored ham with enough moisture.
You have been this patient; therefore, you deserve a handsome reward. I recommend that you crank up the heat temporarily. This will aid the glaze caramelizing, creating an out shell. As soon as the glaze is on, turn on your oven and set it to 450 degrees then, all you need is to watch your ham as it cooks carefully, but don’t hesitate to reduce the temperature as soon as you see the glaze begins to harden.
Wrong Temperature Measurement
Getting your meat thermometer is an ideal way for testing your own ham at home. The thermometer should get close to the bone so that it can read from one of the deepest points of the meat. Generally, when a ham reaches 145, it is considered done; don’t allow it to stay in the oven before it reaches this final temperature. Don’t worry about your ham not reaching 145 degrees; it will continue to cook on the countertop. I recommend that you remove hams from the oven at temperatures between 135 and 140 to ensure they cook perfectly avoiding overcooking and drying.
Serving Ham Immediately
At least give ham that respect by allowing it cools down for some time before serving. Allowing your meal rests for 20 minutes guarantees the penetration of the internal juices into the meat adding more to its moisture and handling a more tender experience for you.
Final World on Overcooked Ham what to do
Take your time to apply the entire trick as far as possible. Starting from the methods of reviving an overcooked ham down to avoiding the 11 most common mistakes people make during the cooking process.
It may seem impossible to bring back the flavor and moisture of dry meat due to a mistake made, but the good news is that it is always possible with my tricks or hacks. In order to help you minimize the mistakes commonly made by people during the cooking process, I took my time to research on the various mistakes people have made before now. I believe these mistakes will serve as lessons for you so you can identify and avoid them too.